

Final Cut Pro is one of the most versatile editing software out there, and when you first start working with it, it can be quite overwhelming. Apparently simple activities like changing or adding text or saving projects can really slow down your entire workflow. Now, I’ll show you how to export in Final Cut Pro, and also discuss the different formats it supports.
Exporting in Final Cut Pro
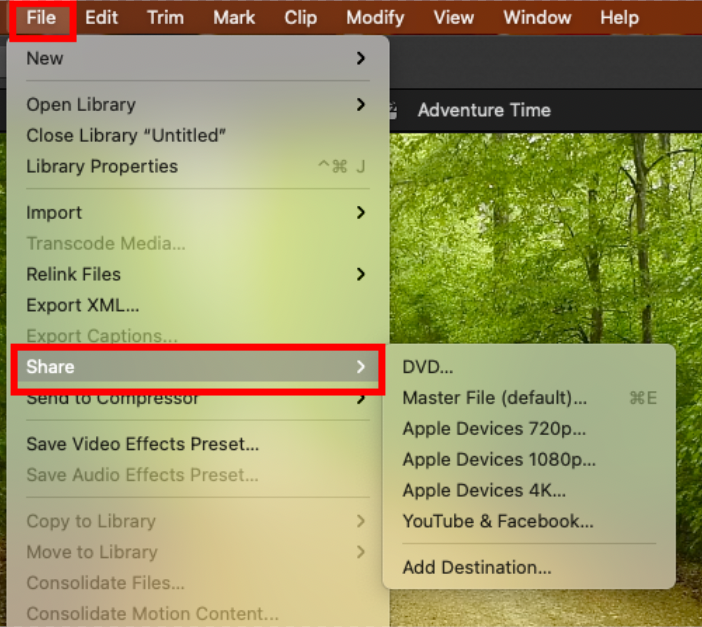
1. Find the “File” Menu and Click “Share”
Instead of the classic “Export” button we see in Premiere Pro or DaVinci Resolve, FCPX has a “Share” button.
So far, it seems pretty straightforward. However, each of the Share options will give you additional settings to choose from, so let’s take a look at them.
- DVD — This option exports your footage as a .m2v file which uses MPEG-2 compression. It’s the standard industry for DVDs, doesn’t export sounds, and to be honest, it’s outdated.
- Master file — Through this option, you can export a .mov file containing the video and sound of your footage. You can choose a mastering, publishing, or broadcasting format, and supports 12 codecs — one of which is the beloved H.256.
- Apple Devices — This option is made to quickly save the video, so you can access it on other Apple computers, mostly for previews. They offer 5 codecs, so unless you need to show your clients what you’ve been working on, you may not really need this.
- YouTube & Facebook — Since Apple never misses a party, it has a special preset to export YouTube and Facebook videos. You only get to choose the resolution and compression type, so your files won’t be too large. When you export it this way, it comes out as a .mov file.
2. Choose Your Prefered Option and Configure It
If you just need to export a quick preview, then the Apple Devices or YouTube & Facebook options will do just fine — you’ll get a small file that easy to store and share with your collaborators. However, if you need to export the final project, it’s best to select the Master File option and adjust your settings.

Once you choose your preferred export option, you need to click on the “settings” tab and adjust the parameters. You can freely choose the format and video codec, but the resolution will be the one set in your project.
You can see the size of your file along with its format in the bottom right corner, and when you’re done, just click on “Next.”
3. Select a Location and Export

Once you’re done, you’ll find the video in the chosen location, and it shouldn’t take too long for it to open up in QuickTime.
What Formats Does Final Cut Pro Support?
In total, Final Cut Pro supports around 46 sound, video, still-image, and container formats. Even though this is an overwhelming number, you’ll probably end up using 3 or 4 of them. The most important are:
- Apple Animation codec
- Apple Intermediate codec
- Apple ProRes
- H.264
- HDV
- HEVC
- Motion JPEG (OpenDML only)
- MPEG IMX (D-10)
- QuickTime formats
- REDCODE RAW
- Uncompressed 8-bit 4:2:2
- Uncompressed 10-bit 4:2:2
- MP3
- MP4
- RF64
- WAV
- BMP
- GIF
- HEIF
- JPEG
- PNG
- PSD (static and layered)
- RAW
- TGA
- TIFF
Now you know how to export in Final Cut Pro, and also what types of formats it supports. What are you going to create now?