

Last updated on 30 June 2021
Many of the people who just started to learn about Cinema 4D confuse rendering with exporting or saving a video. To render in Cinema 4D, there are a couple of ways to do it and you have some different types of renders that can be bought. For now, you need to understand the basics of rendering. After you get the hang of it, look for different types of renders that will speed up the rendering times and will improve the looks of your graphics and materials.
In this article, I will assume that you have opened Cinema 4D before. If you are new to C4D, check out GreyScaleGorilla — they have lots of training tutorials that can make you understand the basics and more.
Quick Guide: How to render in Cinema 4D
Step 1: Go to render settings.
Step 2: Make sure to insert the right settings.
Step 3: Add the project to the render queue.
Step 4: Press start render and go to sleep!
Pro Tip: Use one of the image sequence types of rendering output to avoid wasting time in case the program crashes in the rendering process.
Cinema 4D Render Settings
You can access the render settings in three simple ways:
- Use the keyboard shortcut Ctrl+B (Windows) or Cmd+B (macOS).
- Expand the Render menu, and scroll down and click on “Edit Render Settings”.
- Click on the old-fashioned icon in the tool menu.

There is no right way to set the settings in Cinema 4D. You simply have to understand exactly what everything does and set them accordingly to the needs of your project. Output and Save are basic settings and will not affect the final result that much. Depending on what materials, blurs, lights, shading, or other effects are used in your project, you will have to add them in the Render Settings. Add them from the drop-down menu called “Effect.”

Output
In the output tab, you can set things like resolution, the width, the height, or simply the bitrate. It is really important to set the bitrate to match the project’s bitrate. In this tab, you will also tell Cinema 4D the range of the rendering, from what frame to start and where to end the rendering.
Save

In the save tab, you can choose the name and location of the file, the format, and the dept. If you want a transparent background, you will have to activate the Alpha Channel here. Otherwise, it will render it black.
Multi-Pass
Activate Multi-Pass only when you plan to separate one or more elements from the entire render. This option will add to the final render a separate render with the alpha of that element. To make it work, you will have to add the Multi-Pass Cinema 4D tag to it before.
Anti-Aliasing
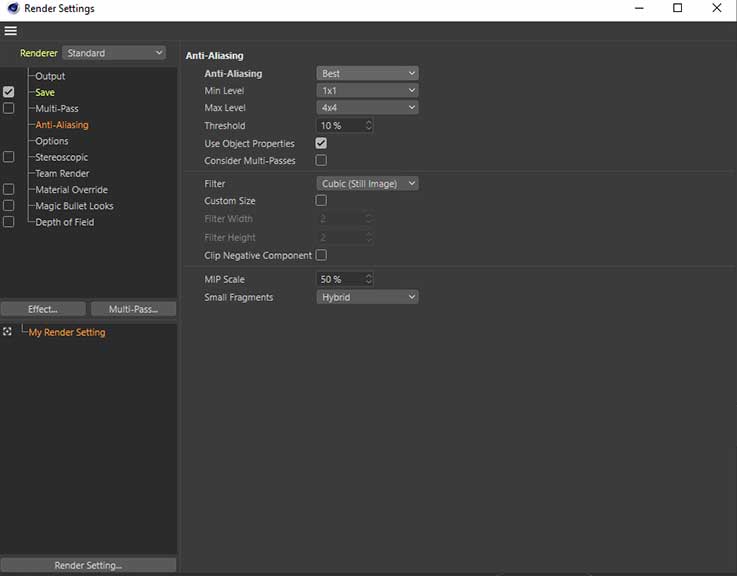
This tab right here goes hand in hand with the computing power of your machine. If you have a beast of a computer, you can crank the settings up for better results. On the other hand, if your computer lacks computing power, consider lowering the values in this tab to speed up the render time.
If the rendering time is still too long, consider going inside the Options tab and lower some of the details, go back to the output and lower the resolution, or use Team Render with one or more machines. Team Render uses the computing power of a group of computers to render out the same project.
Cinema 4D Render Queue and Render to Picture Viewer
After all the settings are set, all you have to do is to start the render and hope it will not crash overnight. Depending on the complexity of your project, the rendering process might take a lot of time to complete—have that in mind when you start working on your project.
One way to render the project is by adding it to the render queue and clicking on the start rendering button. To do so, go to the Render drop-down menu and select “Add to Render Queue” and click the start button.
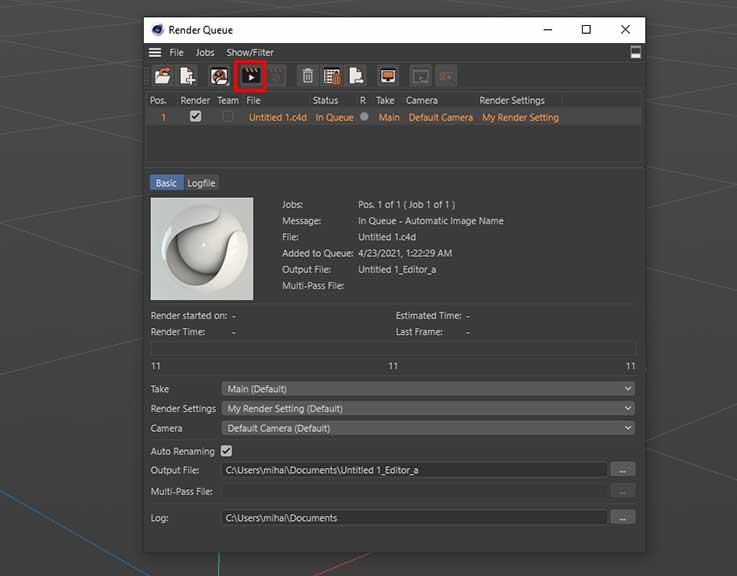
The other way is to simply click on the “Render to Picture Viewer” button from the top-right corner. The picture viewer window will pop up and the render will start automatically.

Cinema 4D Rendering Tips and Tricks
Nothing is flawless — not even Cinema 4D. Errors and crashes happen all the time and it also happens in C4D like in any other program.
If C4D crashes while rendering
If you render to a video format output and the program crashes, all the progress till the point of the crash will be lost because the video file will not be able to play. The solution? Set the output to a PNG or a Jpeg image sequence. This way, all the frames will transform into pictures and if it crashes, you can restart the render from the moment of the crash.
After the render process is completed, import the sequence inside Media Encoder, After Effects, or any other video editing program and encode them to a video output.
Low-res render first
Another tip is to make a small, low-resolution render first. It will take little time to render and you will be able to see small errors that can be adjusted before the final render.
Use full render for one frame by using the Render View or Render to Picture Viewer with the correct render settings set. This is useful to check how the materials, lights, shadows, or shapes look before the final render. You will have the opportunity to make small adjustments before it is too late to do them.
Summary
Cool! This was it! Now you know a couple of ways to render in Cinema 4D, some information on the settings of the C4D render, and some tips and tricks on things to do prior to the rendering process.
If you’e interested in reading more about exporting in other video editing software, please go check my other tutorials on how to render in After Effects and how to render in DaVinci Resolve.