

Last updated on 15 June 2023
Before we talk about how to freeze frame in DaVinci Resolve, let’s talk a bit about what a freeze frame is and what it does. A freeze frame halts the action in your video, effectively converting it to a still frame, making it look like a photograph.
The art of video editing strives to move the viewer’s attention away from the filmmaking process. On the other hand, freeze frames do the exact opposite, but they are invaluable in adding emphasis or covering up for lack of footage.
Back in the days when shooting on film was a thing, you could achieve a freeze frame by optically reprinting the select shot. Today, with digital technologies, freezing a video has become as easy as pressing a small number of keys.
Understanding Freeze Frames
In the realm of video editing, the term “freeze frame” refers to a technique where a single frame or image is repeated or held on screen for an extended period. This creates the illusion of a still image within a moving sequence, effectively “freezing” the action.
A freeze frame is more than just a paused moment in a video; it’s a powerful storytelling device. It can be used to emphasize a particular moment, create dramatic tension, or provide a visual pause for viewers to absorb information.
For instance, in a sports video, a freeze frame could be used to highlight the peak action of a game-winning goal. In a documentary, it could be used to focus on a significant historical photo. In a music video, it could be used to sync with a beat or lyric for added impact.
The beauty of a freeze frame lies in its simplicity and versatility. It’s akin to a still picture, but within the context of a moving sequence, it takes on a dynamic quality. It’s a moment of stillness that contrasts with the motion, making it stand out and draw the viewer’s attention.
One of the key aspects of a freeze frame is its duration. Depending on the effect you want to achieve, you can have a freeze frame that lasts just a fraction of a second, creating a quick pause in the action, or one that lasts several seconds, providing a more prolonged pause for emphasis or contemplation.
The duration of a freeze frame can significantly influence the pacing and rhythm of your video, making it a crucial element to consider in your editing decisions.
Another important aspect is the placement of freeze frames. You can have a single freeze frame in a video, or multiple freeze frames scattered throughout. You can use a series of freeze frames to create a slideshow-like effect or intersperse freeze frames with moving sequences for a rhythmic or jarring effect.
The placement of freeze frames can shape the narrative flow and visual style of your video, adding another layer of creativity to your editing process.
Different video editors offer different ways to create freeze frames, each with its own set of features and controls. Some editors allow you to simply select a frame and hold it, while others offer more advanced options for adjusting the duration, timing, and transition of freeze frames.
Regardless of the editor you use, understanding how to effectively use freeze frames can greatly enhance your video editing skills and creative possibilities.
800+ DaVinci Resolve Animated Elements
Over 800 drag & drop animations that work directly in DaVinci Resolve. Improve your video editing with professional video editing tools. No need to hire animators at a high cost.

Get 30% off – $84 $49
Freeze frame in DaVinci Resolve by changing clip speed
DaVinci Resolve offers two main methods to create a freeze frame: the Change Clip Speed option and the Retime Controls feature. Each method has its own advantages, and the choice between them depends on your specific needs and preferences.
Method 1: Change Clip Speed
- Open DaVinci Resolve and import your video to the timeline.
- Move the playhead to the frame you want to freeze.
- Select the Blade tool and cut the clip on the playhead.
- Move one frame forward with the right arrow key and cut the clip on the playhead again.
- Select the single frame, right-click, and choose the “Change Clip Speed” option.
- In the dialog box that appears, tick the “Freeze Frame” checkbox and click “Change“.
- The selected frame is now frozen. You can adjust its duration by dragging its edges on the timeline.
Video tutorial
Freeze Frame in DaVinci Resolve using Retime Controls
This method is used for better time control over the footage. You can also include curves with Retime Curves to smooth things up.
Together with the Optical Flow option, Retime Controls, and Retime Curves, you can create a slow-to-freeze effect that won’t stutter that much. Before we do that, let’s see how to freeze frame in DaVinci Resolve with Retime Controls.
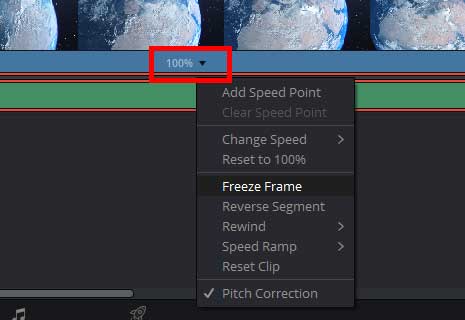
Method 2: Retime Controls
- Right-click on your clip or use the shortcut “Ctrl+R” or “Cmd+R” to access the Retime controls.
- Place the playhead where you want to start your freeze frame.
- Click the small black triangle to expand the dropdown menu, then click “Freeze Frame“.
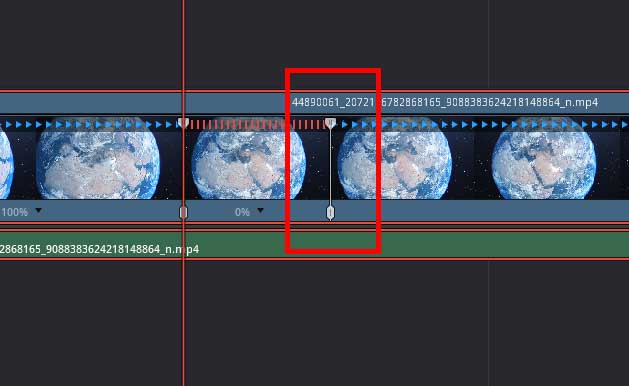
- The selected frame is frozen for a fixed duration, and the remainder of the clip continues at normal speed.
- Drag the speed points (vertical bars) on either side of the freeze frame to change the duration.
Advanced Freeze Frame Techniques in DaVinci Resolve
While the basic freeze frame is a powerful tool in itself, DaVinci Resolve takes it a step further by offering advanced techniques that can add a new level of dynamism and creativity to your videos. One such technique involves creating freeze frame intro titles using the Fusion page in DaVinci Resolve.
This process combines the use of freeze frames with other elements such as background nodes, animated rectangles, and text to create a captivating title sequence. Here’s a more detailed look at how this can be done:
Creating a Freeze Frame
The first step in this process is to create a freeze frame in your video where you’d like the title to appear. This can be done using either the Change Clip Speed option or the Retime Controls feature, as described in the previous sections.
Once you’ve created the freeze frame, make sure to extend its duration to fit the length of your intended title sequence, typically around 2 seconds.
Adding Background Nodes
Next, navigate to the Fusion page in DaVinci Resolve. Here, you’ll add three Background nodes that will form the main part of your title animation. The first Background node should be set to a pastel color or another color of your choice, with its Opacity reduced by changing the Blend mode in the Merge node. This will create a semi-transparent background for your title.
The second and third Background nodes should be set to the same or similar color as the first one, but without changing the Opacity. Instead, add a Rectangle mask to each of these nodes and adjust the Width, Height, and Angle of the Rectangle mask to create a dynamic shape across the screen.
Animating Rectangles and Text
Once you’ve set up your Background nodes and Rectangle masks, it’s time to animate them. Use keyframes on the Position of the rectangle mask to make the rectangles slide in and out at the start and end of the clip. This creates a sense of motion and energy in your title sequence.
Next, add a Text node with the name of your subject in a nice font and color. Animate the text using keyframes on the write-on effect in the Inspector. This will make the text appear to write itself onto the screen, adding an extra layer of animation to your title sequence.
Finalizing the Sequence
Finally, duplicate your MediaIn node and add it after all the other nodes. This will overlay your original video over the animated title sequence. Use a Polygon mask to carefully cut out your subject from the freeze frame, creating a layered effect where your subject appears to stand out from the background.
With these steps, you can create a dynamic and visually engaging freeze frame intro title in DaVinci Resolve. This advanced technique takes the simple concept of a freeze frame and elevates it into a creative storytelling device, showcasing the power and flexibility of DaVinci Resolve as a video editing software.
Applications of Freeze Frames
Freeze frames are not just a tool for creating dramatic pauses or emphasizing moments. They can be used creatively in various types of videos. For instance, in films, a freeze frame can be used at the end to leave the audience in suspense or to create a memorable closing image.
In commercials, freeze frames can highlight product features or important messages. In music videos, they can sync with the beat to create a rhythmic visual effect.
Choosing the Right Moment to Freeze
The impact of a freeze frame largely depends on the moment you choose to freeze. It could be a moment of high action, a significant glance, a stunning landscape, or any other frame that you want to highlight. The key is to choose a moment that contributes to the story you’re telling or the message you’re conveying with your video.
Combining Freeze Frames with Other Effects
DaVinci Resolve offers a plethora of video editing tools and effects that you can combine with freeze frames for more complex and creative results. For example, you can apply color grading to your freeze frames to make them stand out, or use transitions to smoothly enter and exit the freeze frame.
You can also add text or graphics to your freeze frames for explanatory or decorative purposes.
Comparing DaVinci Resolve’s Freeze Frame Feature with Other Software
While DaVinci Resolve is a powerful tool for creating freeze frames, other video editing software also offers this feature, each with its own strengths and weaknesses.
For example, Adobe Premiere Pro provides a user-friendly interface and extensive editing tools, but it may be overkill for simple projects and its subscription model can be expensive.
On the other hand, iMovie is free and easy to use, but its freeze frame feature is less advanced and offers fewer customization options.
Exporting Stills
If you need to save a still frame of your freeze frame (or any other frame from any clip), you can do so on the Color page. Simply right-click in the viewer while the playhead is positioned on the frame you want, then export the still as a .png, tiff, or jpg file.
Conclusion
Freeze frames are a versatile tool in video editing, and DaVinci Resolve provides a powerful and flexible way to implement them. Whether you’re a professional video editor or a beginner, understanding how to create a freeze frame in DaVinci Resolve can help you make your videos more engaging and impactful. So, don’t hesitate to experiment with this feature and explore its creative possibilities.