

Last updated on 6 May 2022
When you start learning Adobe After Effects, you tend to look for basic stuff. However, after you master them, you want to jump directly to the cool stuff. There is nothing wrong with doing so, but some of the tricks, methods, or features get lost along the way in this process. You might not think you need them until you learn what they can do.
There are a lot of tricks and ways to do things out there that make it impossible to cover all of them in one single article. Therefore, here are 7 uncommon tricks every After Effects user should know:
1. Math + Multiply the resolution
Have you ever wondered how to move an object a specific number of pixels, how to multiply the resolution of your composition by 2, or how to move the timeline cursor to exactly 14 pixels?
This is very possible and easy to do inside After Effects! This works with any parameter’s numerical value. There can be any type of mathematical operation: divide, multiply, add, and more.
Here are some examples:
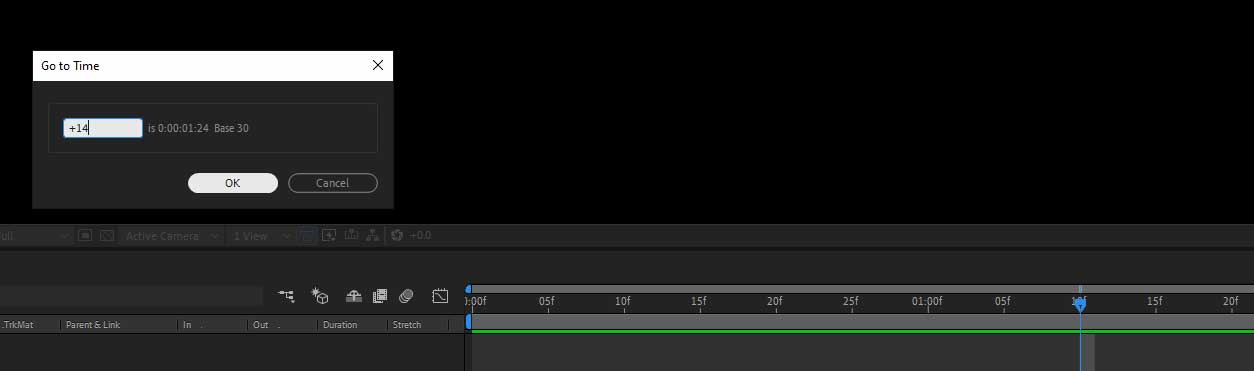
After you press ok, the timeline cursor will move exactly 14 frames forward in time.
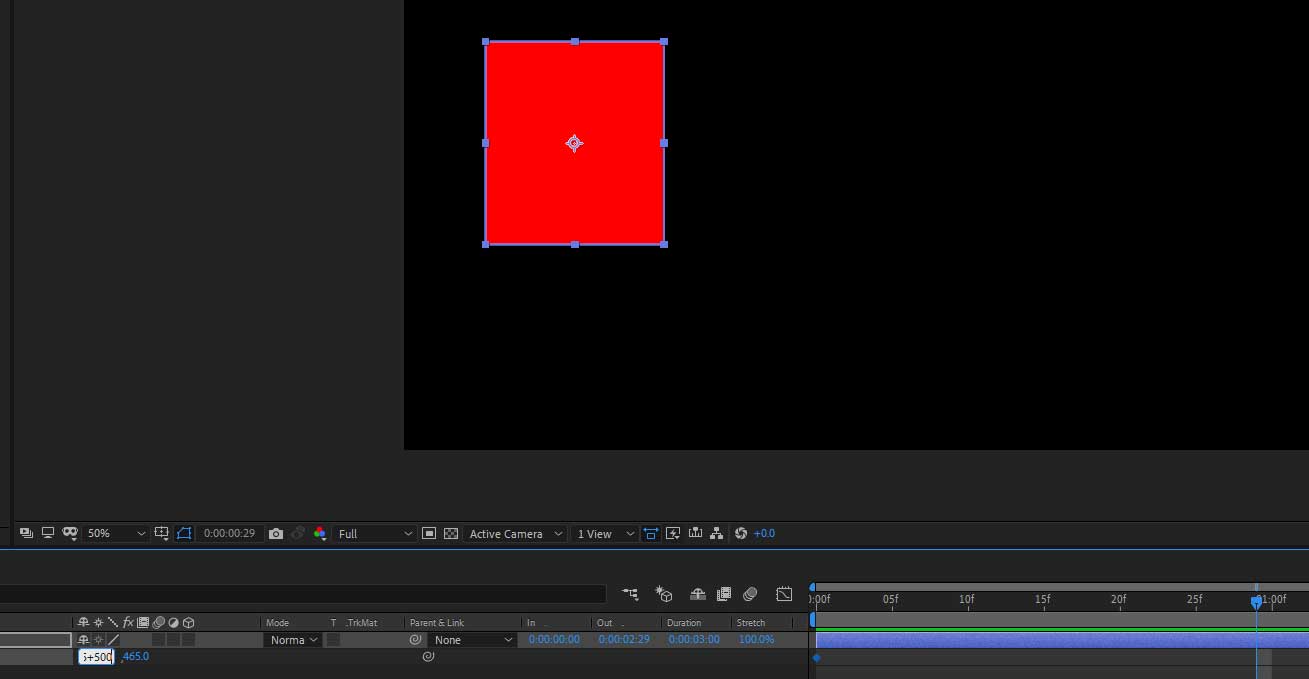
If you type in after the initial value +500, the layer will move 500 pixels forward. This way, you can set it to 4K faster, and you don’t have to know the exact values.

2. Copy With Property Links
As one of the many uncommon tricks every After Effects user should know, Copy with Property Links enables you to modify properties for many layers at the same time. This allows you to make quick adjustments when working with many similar layers whenever the need arises.
Instead of the normal copy shortcut, the shortcut for Copy with Property Links is Control + Alt + C (for Windows) or Command + Option + C (for macOS).
You can also do this by going to Edit and selecting Copy with Property Links. After you select the layers you want to apply it on, use the normal paste shortcut Control + V ( for Windows) or Command + V (for macOS).

I put together some barrels on the floor. I will use them to give you a good example of how this feature works — check the video below and see for yourself.
3. Spatial Interpolation – Movement between keyframes
I think this is a problem everyone who started using After Effects ran into. At first, I had no idea what was happening. I asked myself “Why is my object moving between two identical keyframes?”. After some digging, I learned about Spatial Interpolation and how to set it correctly so it won’t bother me anymore.
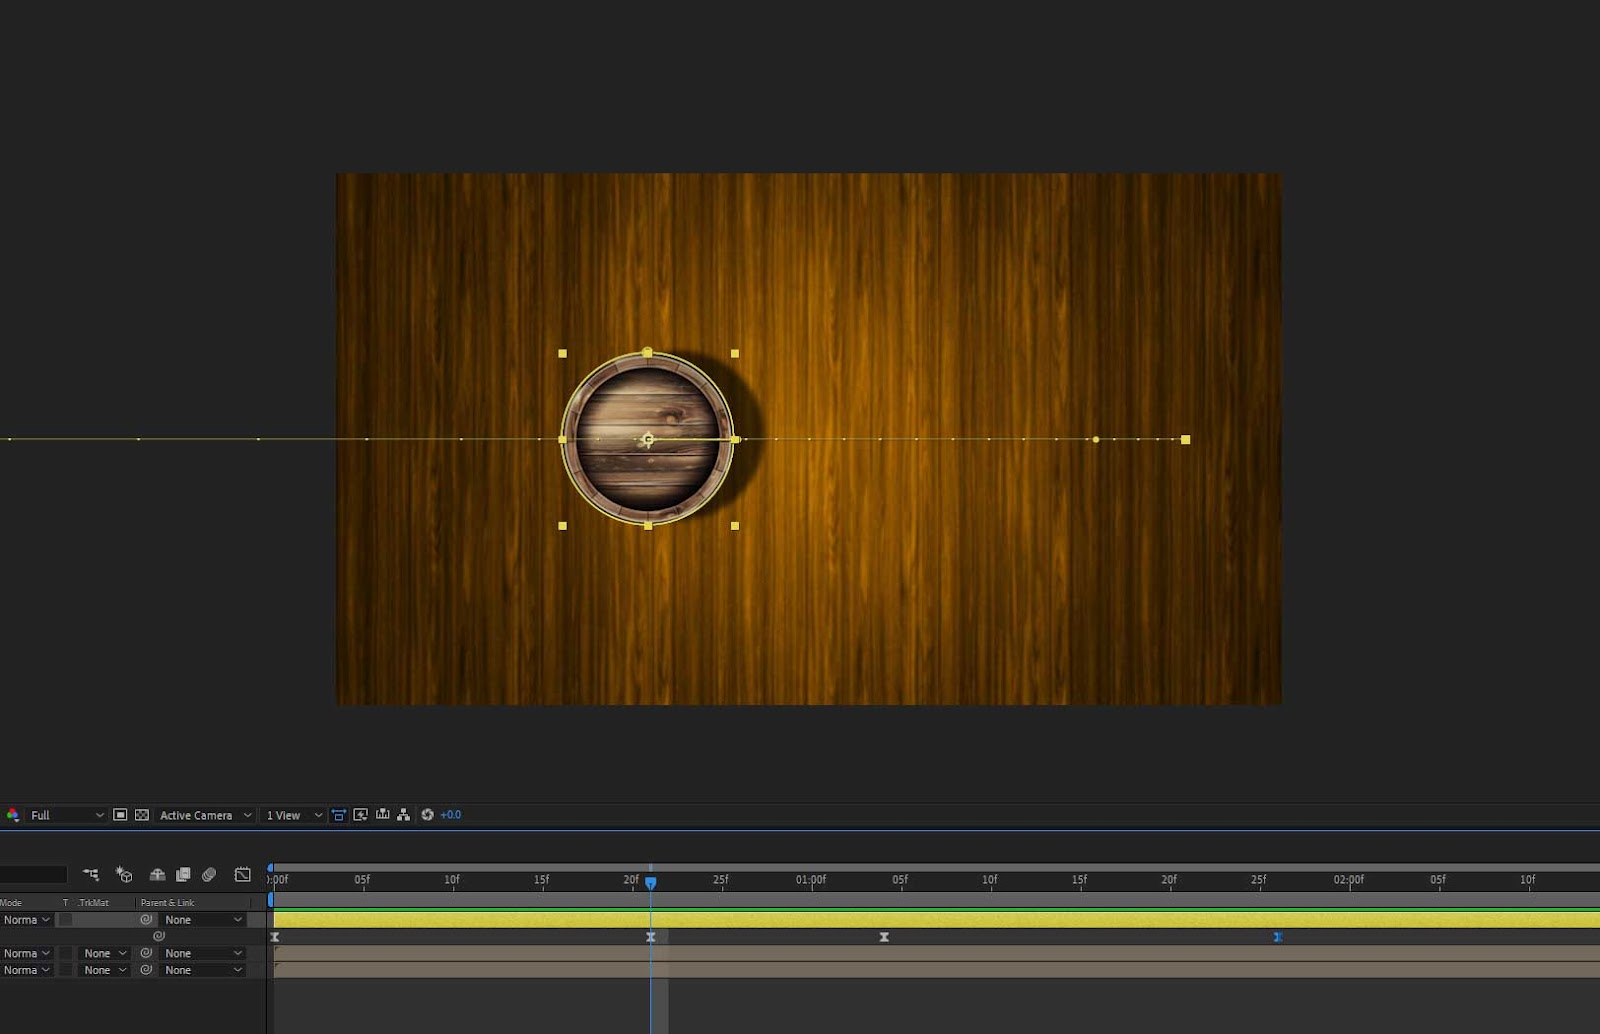
If you have this problem, simply select your keyframes, right-click on one of them and go to Spatial Interpolation. A new window with Temporal Interpolation, Spatial Interpolation, and Roving will pop up. Here, you have different modes for each of these settings and also a small description for each of them. All you have to do is to set Spatial Interpolation to Linear and press OK.
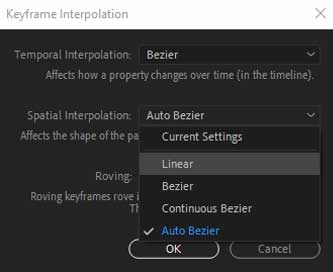
This setting is meant for shaping the path of the motion; this way, you can create curved movement paths with ease. To do so, drag one of the small handle sticks, just like you would do with a mask when you want to curve it. To make it work, you have to set Spatial Interpolation to Bezier.
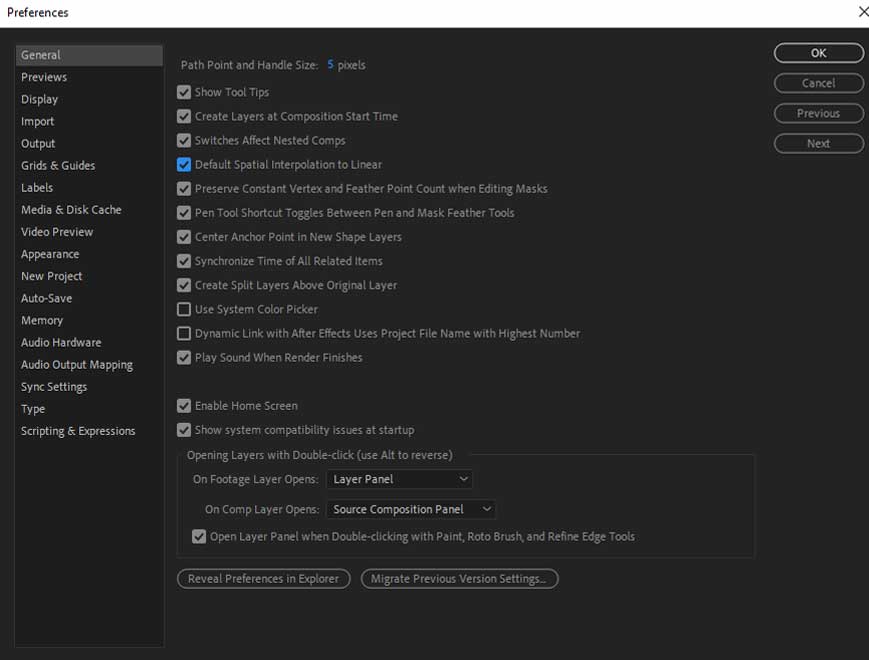
Another way to solve this issue is to go to > Preferences in the General section and check the box for Default Spatial Interpolation to Linear.
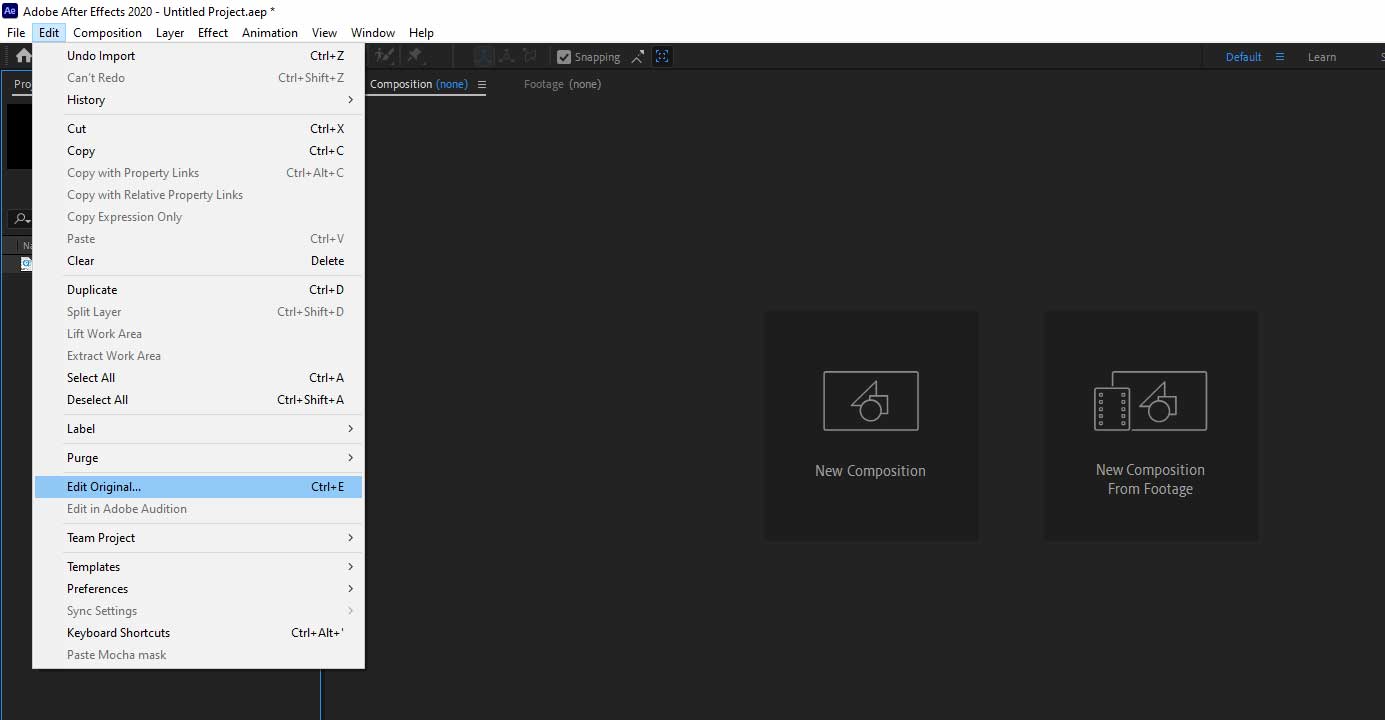
4. Edit Original – Find an AE project easily with a rendered video
As one of the many uncommon tricks every After Effects user should know, this feature shines when you work in a team. You want to access an After Effects project that you don’t know the location of, but you have the rendered video from that project. Imagine being at work and there is nobody around you. What do you do?
Take the video that came out of that project and import it inside a new project of After Effects. Next, select it, go to edit, and click on Edit Original or simply use Control + E (for Windows) or Command + E (for macOS). Therefore, the project in which the video was created will open up.
5. Scaling a Selection of Keyframes
After you finish your animation, you might realize that you need it to go faster or slower overall. One way to do it is to drag each keyframe and waste a lot of time in the process. But there is another easy and faster way to do it.
To scale the entire selection of keyframes, you have to hold Alt (on Windows) or Option (on macOS) and drag it how you see fit.
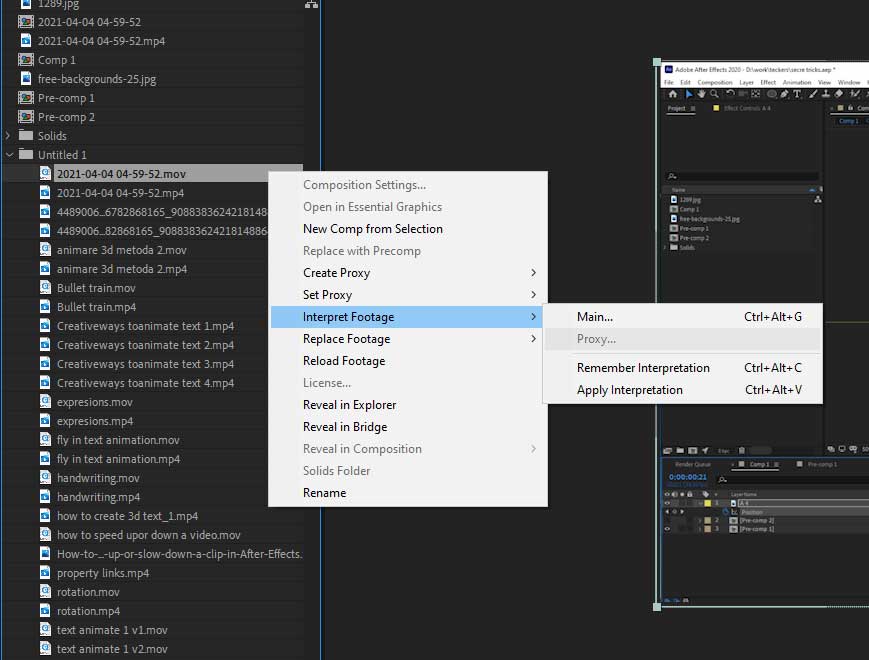
6. Remember and Apply Interpretation for projects with multiple framerate videos
Have you ever found yourself in a situation where you had to interpret a lot of footage because the frame rate of the video was wrong? Well… we all did! I am almost sure you selected them one by one, adjusted the refresh rate, and ended up wasting a lot of time in the process.
An easy and fast way to do it is to interpret only one video, right-click on it, go to Interpret Footage, and select Remember Interpretation. With the interpretation remembered, select all the other videos you need to interpret and do the same steps, but instead of Remember Interpretation, you will select Apply Interpretation.
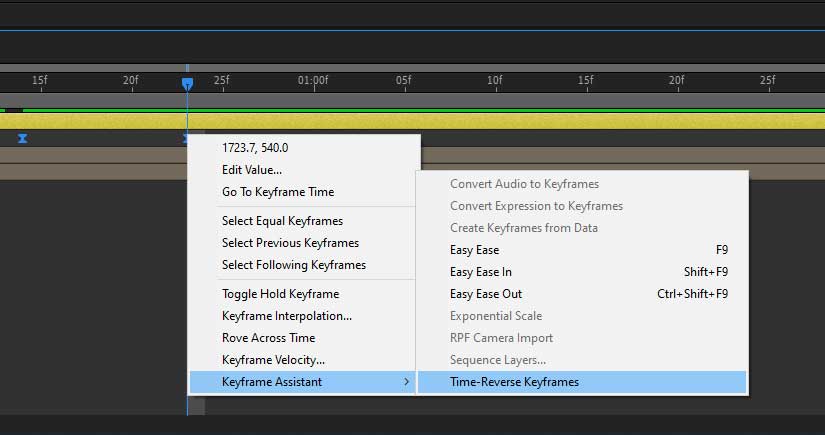
7. Time-Reverse Keyframes
Not knowing or ever reading about the features of the software you are using will not enable you to use it at its fullest potential. For example, when I started using After Effects, I never read everything. Time-Reverse Keyframes was easily missed by me and I was struggling to move keyframes around and also precomposing the animation and time-reversed it.
Embarrassing as it may be, it did happen to me, so it might happen to someone else. Therefore, it is best to avoid that and learn how to use Time-Reverse Keyframes.
Select your keyframes, right-click on Keyframe-Assistant, and select Time-Reverse Keyframes.
Cool, now you know some of the most uncommon tricks for After Effects that I use. Make them part of your workflow and you will see you will not stop using them. Please let me know in the comments below some of the uncommon tricks you know every After Effects user should know.