

Last updated on 5 July 2022
DaVinci Resolve is capable of top-notch, professional keying with the push of a few buttons. In this article, I will show two of the easiest ways to remove the green screen or Chroma Key in the DaVinci Resolve.
But first, have you ever wondered how they manage to get actors in those otherworldly and stunning locations? There are many times when you see life-threatening situations in films. You sure realize actors are never in a life-threatening situation, otherwise, nobody would want the job.
As it’s never cheap to build sets, or go into space to take a shot, chances are they manage all this with help from a technology called Chroma Key or “Green Screen”.
What is a Chroma key?
Chroma Key is often perceived or referred to as a “blue screen” or most commonly “green screen”. It involves filming objects or actors in front of a single-color flat screen. The screen is usually, as you can guess, green or blue.
In post-production, video editors use editing software to “key out” or to remove the flat screen from behind the subject. This way, everything that is blue or green will become transparent or see-through. After, he can then change the background and place the subject wherever.
2 Easy Methods to Chroma Key in DaVinci Resolve
There are more than two ways to remove a green screen or a blue screen inside DaVinci Resolve. The next two methods are the easiest and quickest to learn. These tools deliver great results by just applying them over the footage — you don’t have to struggle a lot with the adjustments. Therefore, without further ado, let us jump right into it!
Remove the Green Screen in DaVinci Resolve Inside the Color Tab
Step 1 – Add the Qualifier Tool & select the colour
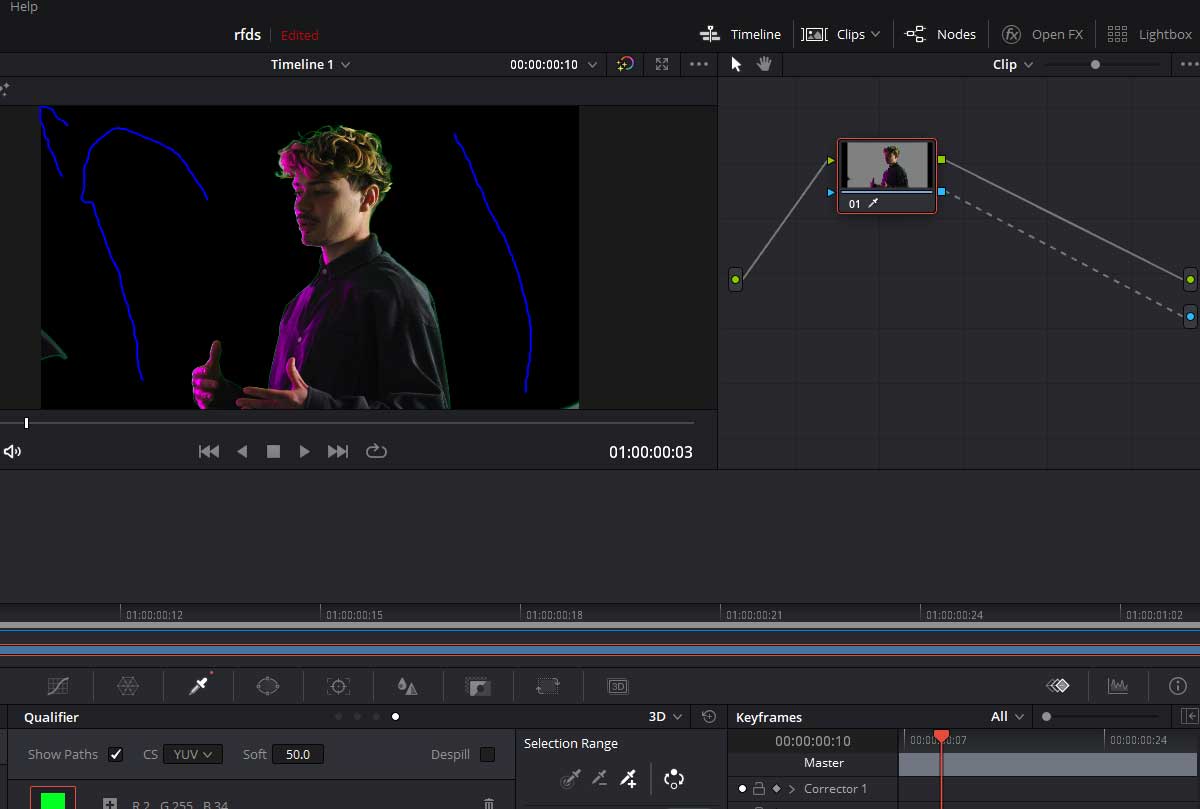
After you finished cutting the video, jump inside the “Color” tab and go ahead and select the Qualifier Tool. Make sure you set the tool in “3D” mode to enable us to select a bigger range of the green spectrum.
Do this by simply selecting the fourth dot from the middle-upper area of the window or by selecting it from the drop-down mode selector situated in the window’s top-right corner.
After selecting the 3D mode for the Qualifier Tool, go ahead and select the range of green color you want to remove by simply drawing lines on top of the screen, similar to the way I did in the image below.
Pro Tip: Try to include the dark and light areas of the green screen; this way DaVinci Resolve will know exactly what to key out.

Step 2 – Removing the colour
As you can see in the small rectangle, Resolve did the keying, but it doesn’t know what to do with it because we didn’t specify. Right-click underneath the node, select “Add Alpha Output” and then link the node.
Yes, I know it will key out the subject and not the green screen. There is no problem. Go ahead and select the Revert button situated in the “Selection Range” window. Everything should be OK now.

Step 3 – Clean the edges
As you can sure notice, there are still some issues we have to address. In the hair area and on the outline of the subject, there is a noticeable green color spill. We clearly don’t want that! On top of this, there will be many situations where you will still notice some noisy green pixels in the transparent area, around the corners of the screen, or the subject.
To get rid of these problems, we have to jump into the Qualifier window. Here, there are many settings you can play with to tweak the output. Most of the time, you will solve these problems by checking “Despill”, further select more of the greens and add them in the Selection Range, or modify the shrink, ”Black Clip” and “White Clip”.

Done!
This is all for this method! Go ahead and add a background in the “Edit” mode and your job is done! Feel free to watch the video below, where I went through the same steps as above, but faster.
Remove the Green Screen in Davinci Resolve With the Delta Keyer Tool
If the previous method seemed too long or maybe it had too many steps, don’t worry about the Delta Keyer tool. It is extremely easy, fast, and you are left with little things to adjust. With good footage, you just apply it, and you are done!
Step 1 – Select and add the Delta Keyer tool
To remove the green screen inside DaVinci Resolve in the “Fusion” tab, right-click inside the “Nodes” panel, go to “Add Tool”, then to “Matte” and select the Delta Keyer tool.
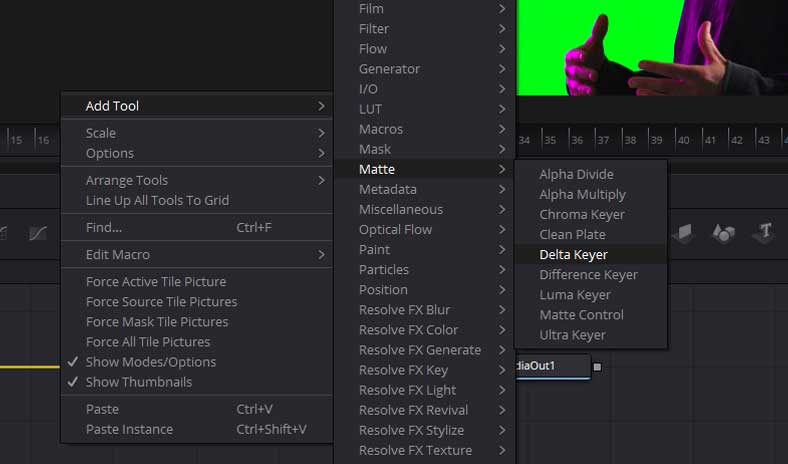
As you can see, there are other chroma keyers available. Delta Keyer will get the job done all the time, without fail. It is one of the best keying tools in the industry, so use it without worries.
Step 2 – Link the tool between the two nodes
Go ahead and link the tool between the two nodes. As a result, a new window will pop up in the top right corner of the screen. Here you have all the settings of the Delta Keyer tool!
Step 3 – Select the colour
The first thing you want to do is to drag the color selector over the screen and release it over the color you want to key. You can then play with the green, red, and blue sliders to adjust the keying.

Step 4 – Tweak your settings
At this point, the result should already be a good one. If you still want to modify things like the softness of the margins, you want to erode them a little bit, or further tweak the image, go through the settings, and adjust how you see fit!

Done!
This is it for this tool! Go ahead and add a background in the “Edit” mode, and your job is done! Feel free to watch the video below, where I went through the same steps as above, but faster.
Which is your favourite method?
To wrap things up, go ahead and see which one of these methods is your favorite. Try them, test them and see what works best for you!
Cool, now you know how to Chroma Key or how to remove a green screen in DaVinci Resolve, and you have a couple of ways to do it!
Please feel free to see my other articles on how to remove a green screen in After Effects or other DaVinci Resolve Tutorials.
Big thanks for the footage to Stunt Camera Crew. See how they accepted the #ShootLikeAPro challenge to “break the boundary of time”. Completing 3 amazing videos in just 3 days was never a problem!